Adding images or galleries to posts or pages is easy in WordPress.
The starting point is to add your images to the Media Library. This is discussed in more detail in FOFA Manual – Images and the Media Library. Pay special attention to the discussion of image sizes and standards there and elsewhere.
Once you have your pictures in the Media Library you can open your post in the editor or create a new post. I find it easiest to enter the text for the post first and then to add the images, but you could just as well add some text, then some images and so on. Take your pic
Insert a single right-adjusted image
So, assuming you have your text in the editor window and want to add a single image:
- Hover your cursor between the text paragraphs where you want to insert. A “+” sign should appear. Click it and then select Image.
- Select media Library as the source which opens it.
- Search for the image – the library is sorted by added date, so probably your image is at or near the top. Otherwise, try the text filter for file name or caption.
- Click the image, the the Select button at lower right.
- That will place a full-sized image into the editor widow.
- While that image is still selected, change the image size to Medium in the right sidebar.
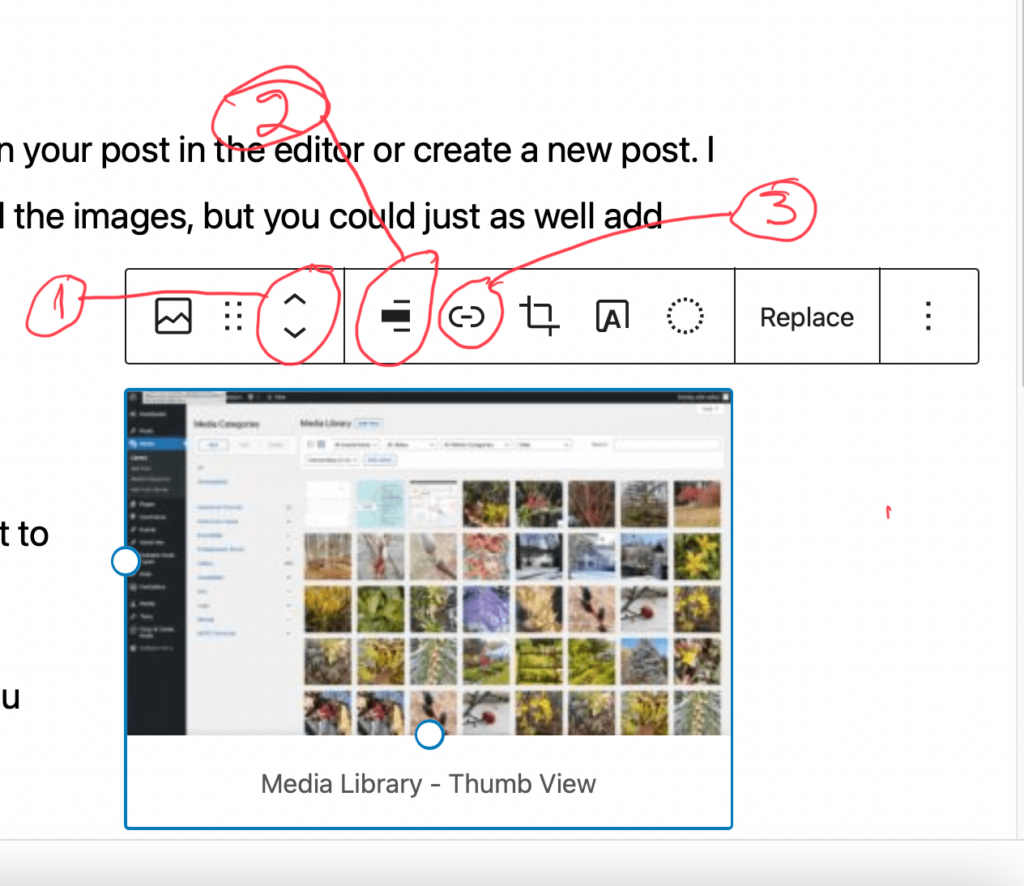
- Then, change the alignment to Align Right in the image block toolbar (#2).
- You can move the image up or down on the page by clicking the arrows in the image block toolbar (#1).
- Click the link button (#3) in the toolbar and then Media File to add a link to the image so when you click it the full-sized image opens.
- Click the Publish or Update button to save your changes. Remember to click publish twice.
Repeat this process to add more images throughout the post.
Insert a photo gallery
Sometimes inserting a group of pictures, a photo gallery, is more appropriate. To do so takes three steps:
- Add your images to the Media Library.
- Create a photo gallery with the FooGallery plugin.
- Insert that gallery into your page or post.
1. Add your images to the Media Library
- Gather your images, resizing if necessary to fit under the 2 MB image size limit. A good pixel size is long edge = 2400 pixels.
- Add the images to Media Library following these directions: FOFA Manual – Images and the Media Library
- Categorize the images as “Gallery” and add captions and descriptions (this is very important — Google downgrades our search if we have pictures without the ALT or DESCRIPTION field).
2. Create a photo gallery with FooGallery
FooGallery is a WordPress plugin that speeds gallery creation. Follow these steps:
- In the dashboard, click on FooGallery, then Add New Gallery.
- Add a title to your gallery, then click the button “Add from Media Library” which then opens.
- Select all the images you want to include, then click the “Add Media” button in the bottom left.
- Your gallery is ready to save, so click “Publish” in the right sidebar.
- Now click the Shortcode further down the right sidebar. This copies that code to your clipboard which you will use in the next section, inserting the gallery into the post.
3. Insert the photo gallery into your post
Now you can either create a new post (in left sidebar Post | Add New) ir open an existing post (in left sidebar Post | All Posts then open the desired post in edit mode.
Select the place you want your gallery in the post and add a new shortcode block:
- Place your cursor where you want the gallery.
- Click the “+” button at the top to open the block add screen. Search for shortcode and then click it.
- Click in the box where it says “Write shortcode here” and then paste the shortcode from the earlier section. If you have lost it from your clipboard, you can go back to FooGalley, open the desired gallery and click the shortcode again. Be sure to save your post first by clicking switch to draft or Publish or Update at the top right. Then return to your post and paste the shortcode into its block.
And that’s it. Once you Publish or Update the post, the text and the gallery you created will appear for everyone to see.
